Managing Folders
This section of the settings task allows you to manage the tree of mailbox folders.
The hierarchical folder tree is displayed in the middle list widget where you can select a single folder by clicking it. Folder information and some settings then appear in the right properties pane.
There might be folders which are grayed out and which cannot be edited nor deleted or renamed. Such folders are “virtual” folders which are only there for structuring but which cannot contain any messages.
Some Special System Folders cannot be renamed or unsubscribed because they have special purposes and are used by system processes.
Subscribe to Folders
In the folder list, the right column indicates whether a folder is subscribed and by clicking the checkbox, the subscription for that folder can be changed.
Subscribed folders appear in the email view whereas unsubscribed ones are hidden and only visible here.
Create a new Folder
- Click the Create new Folder icon (+) in the list footer
- Enter a name for the new folder in the properties form on the right
- Select a parent folder or — to create the folder on top level
- Click the Save button below the form to finally create it
Note
The Parent folder field is already pre-selected whith the folder currently selected in the folder list on the left.
Manage the Folder Hierarchy
Folders can be nested to build a hierarchical structure to store your emails. Even an existing folder can be made a subfolder of another one or moved to the top level.
To move a folder simply drag & drop it with the mouse from the list onto the desired parent folder.
Alternatively the parent folder can be selected in the property form in the right and by hitting Save the currently selected folder is moved to its new parent.
Delete Folders
- Select a folder in the list
- Open the Folder Actions menu in the list footer and click Delete
- Confirm the deletion
Share Folders
Personal folders can be shared with other users of the email server either for reading only or with fine-grained permissions. Select a folder in the list and if you’re permitted to control sharing for this folder, the sharing section below the folder properties on the right shows a list of users the folder is already shared with and their individual access rights.
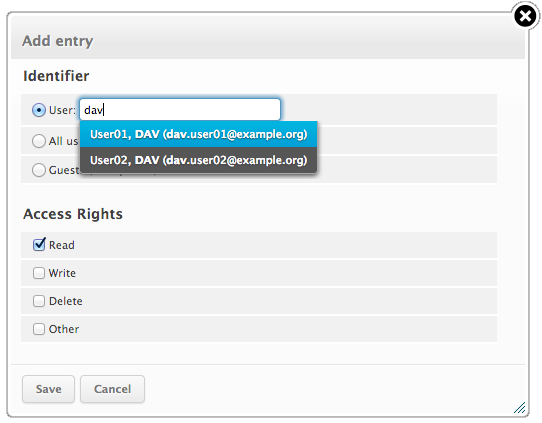
Grant new Access Rights
- Click the Add entry button (+) in the sharing list footer
- Enter the username or choose one of the autocompletion entries proposed as you type. Instead of a specific user, permissons can be granted for all users or guests.
- Select the access rights you want to grant to the user
- Click Save to add the permission
Edit Access Rights
- Select the permission entry in the list
- Click Edit in the Access rights actions menu in the list footer or just double-click the line
- Adjust the Access rights in the dialog that appears
- Click Save to close the dialog
Revoke Access Rights
- Select the permission entry in the list
- Click Delete in the Access rights actions menu in the list footer
- Confirm the deletion
Search for Folders
If the list of folders happens to be very long, a search box can be unfolded from the magnifier glass icon in the header of the folder list. The folder tree is reduced to matching folders as you type in the search box.
Right above the search box, a drop-down menu provides ways to reduce the folder list to common scopes (aka “namespaces”) like “Personal”, “Shared” or “Other users”. The selection may vary with the capabilities of your email server.